

PC上で Blackmagic Camera のための互換性のあるAPKをダウンロードしてください
| ダウンロード | 開発者 | 評価 | スコア | 現在のバージョン | アダルトランキング |
|---|---|---|---|---|---|
| ↓ PC用のAPKをダウンロード | Blackmagic Design Inc | 3472 | 4.76498 | 3.2 | 4+ |
| SN. | アプリ | ダウンロード | 開発者 |
|---|---|---|---|
| 1. |
 Masquerade Camera
|
ダウンロード ↲ | Queenloft |
| 2. |
GIF Camcorder
|
ダウンロード ↲ | Biyee SciTech Inc. |
| 3. |
Camera Remote for Action Cameras |
ダウンロード ↲ | teq-IT |
| 4. |
Camera Remote
|
ダウンロード ↲ | KiMe Limited |
| 5. |
Photo Blender Camera
|
ダウンロード ↲ | Cidade |
または、以下の PC (エミュレーター) 用の Blackmagic Camera APK をダウンロードしてください。
3 つの簡単な手順で、コンピューターで Blackmagic Camera.apk を使用する方法を説明します。
Blackmagic Camera iTunes上で
| ダウンロード | 開発者 | 評価 | スコア | 現在のバージョン | アダルトランキング |
|---|---|---|---|---|---|
| 無料 iTunes上で | Blackmagic Design Inc | 3472 | 4.76498 | 3.2 | 4+ |
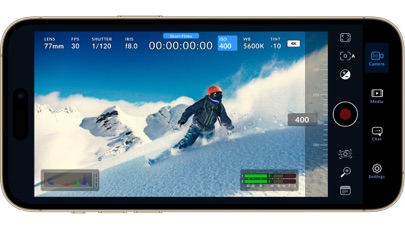
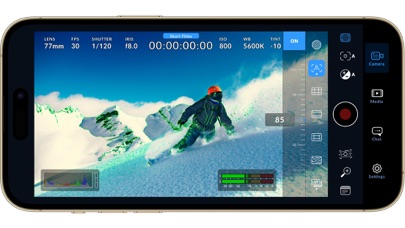
Introducing Digital Film for iPhone and iPad! Blackmagic Camera unlocks the power of your iPhone and iPad by adding digital film camera controls and operating systems! Now you can create the same cinematic ‘look’ as Hollywood feature films. You get the same intuitive and user friendly interface as Blackmagic Design’s award winning cameras. So it’s just like using a professional digital film camera! This means you can adjust settings such as frame rate, shutter angle, white balance and ISO all in a single tap. Or record directly to Blackmagic Cloud in industry standard 10-bit Apple ProRes files up to 4K! Recording to Blackmagic Cloud Storage lets you collaborate on DaVinci Resolve projects with editors anywhere in the world, all at the same time! Get the "Hollywood Look" with Digital Film! Blackmagic Camera puts the professional features you need for feature film, television and documentaries in your pocket. Now you can create YouTube and TikTok content with a cinematic look, and broadcast quality ENG! Imagine having a run and gun camera on hand to capture breaking news whenever it happens! Or use Blackmagic Camera as a B Cam to capture angles that are difficult to reach with traditional cameras, while still retaining control of important settings. Best of all, recording to Blackmagic Cloud allows you to get your footage to the newsroom or post production studio in minutes. Interactive Controls for Fast Setup Blackmagic Camera has all the controls you need to quickly setup and start shooting! Everything is interactive, so you can tap any item and instantly change settings without searching through confusing menus! The HUD shows status and record parameters, histogram, focus peaking indicators, levels, frame guides and more. Show or hide the HUD by swiping up or down. You can auto focus by tapping the screen in the area you want to focus. You can shoot in 16:9 or vertical aspect ratios, plus you can shoot 16:9 while holding your phone vertically if you want to shoot unobtrusively. On Screen Heads Up Display The heads up display, or HUD, controls have the most important camera controls such as lens selection, frame rate, shutter angle, timecode, ISO, white balance, gain and audio levels. You can adjust settings such as exposure by touching the ISO indicator, or you can change the audio levels simply by touching the audio meters. Everything is interactive, so if you tap any item you can instantaneously change its settings without having to search through complex menus! Camera Setup Menus The settings tab unlocks the full power of your phone’s camera, with quick access to advanced settings such as monitoring, audio, camera setup, recording and more! The record tab gives you total control over video resolution and recording format including industry standard Apple ProRes or space efficient H.264 and H.265. Plus, you can set anamorphic de-squeeze and lens correction settings. Professional audio options include AAC and PCM format and VU or PPM audio metering. You can even add external microphones! Or add 3D LUTs to recreate film looks! Media The Blackmagic Camera media tab has all the controls you need to browse or scrub clips for quick review, search and sort and view the upload status of your media. Access your media from Blackmagic Camera’s all clips folder by choosing the Media button to see the thumbnails for each clip you have stored. Plus, you can save to the files folder on the phone, send it to Blackmagic Cloud Storage via Blackmagic Cloud or manually choose which clips to upload to a project library. You can even sync media from Blackmagic Camera directly into the DaVinci Resolve project so you’re ready to edit! Live Sync to Blackmagic Cloud Storage When shooting with Blackmagic Camera, the video you capture can be instantly uploaded as a proxy file, followed by the camera originals, and saved to Blackmagic Cloud Storage. This means you can start editing quickly using your proxies, speeding up your workflow.