
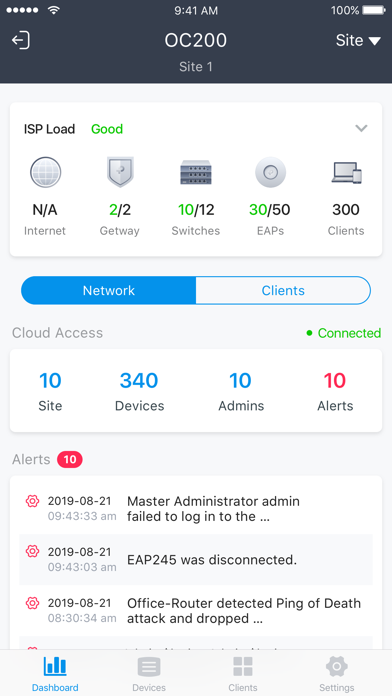
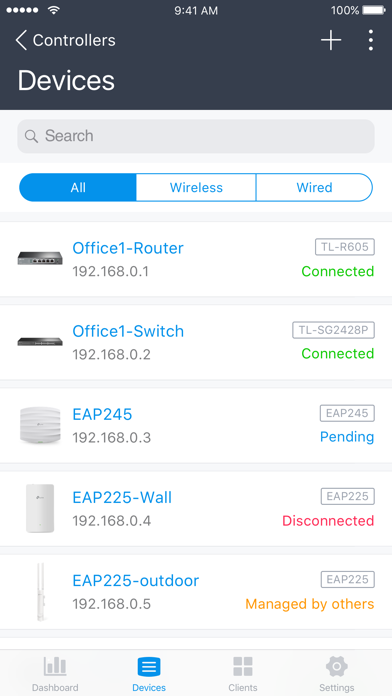
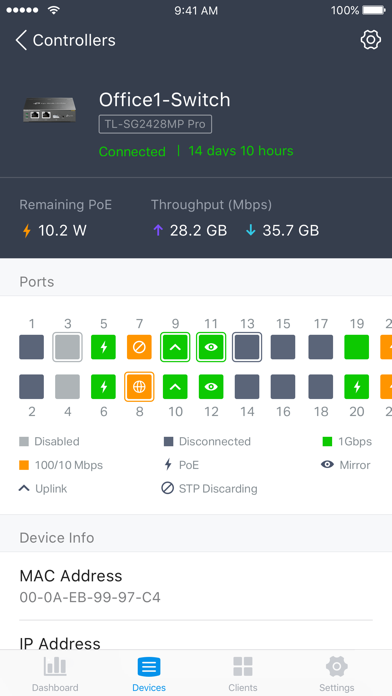
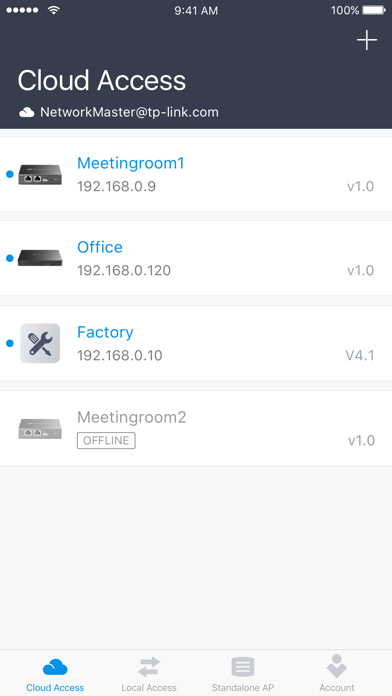
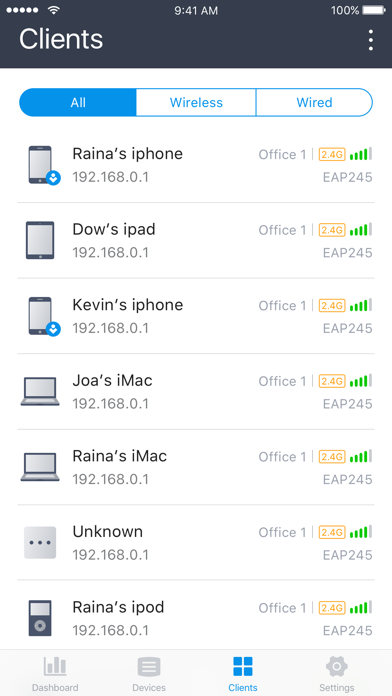
Omada app is used for configuring and managing your Omada devices. You can change settings, monitor the network status and manage clients, all from the convenience of a smart phone or tablet. STANDALONE MODE Standalone mode is designed for managing EAPs or wireless routers right away without having to spend time configuring a controller. Each device is managed separately. This mode is recommended for networks which only have a few EAPs (or wireless routers) and require only basic functions, such as home network. CONTROLLER MODE Controller mode works together with a software Omada Controller or a hardware Cloud Controller, and is suitable for managing multiple devices (including gateways, switches and EAPs) centrally. Controller mode allows you to configure and automatically synchronize unified settings to the devices in the network. Compared to Standalone Mode, more configuration options are available and supports to manage more devices in Controller mode. You can manage devices in Controller mode in two ways: via Local Access or Cloud Access. In Local Access mode, the Omada app can manage devices when the Controller and your mobile device are in the same subnet; in Cloud Access mode, the Omada app can access the Controller across the internet so you can manage your devices wherever you are. Compatibility List: The controller mode currently supports hardware cloud controllers (OC200 V1, OC300 V1), software Omada Controller v3.0.2 and above. (To experience more features support and more stable services, we recommend that you upgrade your controller to a new version). Standalone Mode currently supports the following models (with latest firmware): EAP245 (EU)/(US) V1 EAP225 (EU)/(US) V3/V2/V1 EAP115 (EU)/(US) V4/V2/V1 EAP110 (EU)/(US) V4/V2/V1 EAP225-Outdoor (EU)/(US) V1 EAP110-Outdoor (EU)/(US) V3/V1 EAP115-Wall (EU) V1 EAP225-Wall (EU) V2 ER706W (EU)/(US) V1/V1.6 ER706W-4G (EU)/(US) V1/V1.6 *The latest firmware is required and can be downloaded from https://www.tp-link.com/omada_compatibility_list. More devices supported by the app are coming!
PC上で TP-Link Omada のための互換性のあるAPKをダウンロードしてください
| ダウンロード | 開発者 | 評価 | スコア | 現在のバージョン | アダルトランキング |
|---|---|---|---|---|---|
| ↓ PC用のAPKをダウンロード | TP-LINK | 7 | 5 | 4.19.38 | 4+ |
あなたのWindowsコンピュータで TP-Link Omada を使用するのは実際にはとても簡単ですが、このプロセスを初めてお使いの場合は、以下の手順に注意する必要があります。 これは、お使いのコンピュータ用のDesktop Appエミュレータをダウンロードしてインストールする必要があるためです。 以下の4つの簡単な手順で、TP-Link Omada をコンピュータにダウンロードしてインストールすることができます:
エミュレータの重要性は、あなたのコンピュータにアンドロイド環境をエミュレートまたはイミテーションすることで、アンドロイドを実行する電話を購入することなくPCの快適さからアンドロイドアプリを簡単にインストールして実行できることです。 誰があなたは両方の世界を楽しむことができないと言いますか? まず、スペースの上にある犬の上に作られたエミュレータアプリをダウンロードすることができます。
A. Nox App または
B. Bluestacks App 。
個人的には、Bluestacksは非常に普及しているので、 "B"オプションをお勧めします。あなたがそれを使ってどんなトレブルに走っても、GoogleやBingで良い解決策を見つけることができます(lol).
Bluestacks.exeまたはNox.exeを正常にダウンロードした場合は、コンピュータの「ダウンロード」フォルダまたはダウンロードしたファイルを通常の場所に保存してください。
見つけたらクリックしてアプリケーションをインストールします。 それはあなたのPCでインストールプロセスを開始する必要があります。
[次へ]をクリックして、EULAライセンス契約に同意します。
アプリケーションをインストールするには画面の指示に従ってください。
上記を正しく行うと、ソフトウェアは正常にインストールされます。
これで、インストールしたエミュレータアプリケーションを開き、検索バーを見つけてください。 今度は TP-Link Omada を検索バーに表示し、[検索]を押します。 あなたは簡単にアプリを表示します。 クリック TP-Link Omadaアプリケーションアイコン。 のウィンドウ。 TP-Link Omada が開き、エミュレータソフトウェアにそのアプリケーションが表示されます。 インストールボタンを押すと、アプリケーションのダウンロードが開始されます。 今私達はすべて終わった。
次に、「すべてのアプリ」アイコンが表示されます。
をクリックすると、インストールされているすべてのアプリケーションを含むページが表示されます。
あなたは アイコンをクリックします。 それをクリックし、アプリケーションの使用を開始します。
TP-Link Omada iTunes上で
| ダウンロード | 開発者 | 評価 | スコア | 現在のバージョン | アダルトランキング |
|---|---|---|---|---|---|
| 無料 iTunes上で | TP-LINK | 7 | 5 | 4.19.38 | 4+ |